Pages

Tuesday, 16 July 2013

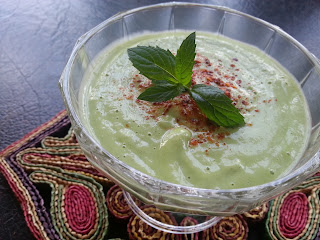
Beat the Heat With This Cold Soup

Today is the first day that I ever craved cold soup - specifically avocado soup. Here's my version of a recipe that I found online. Hope you love it as much as we did!

Cold Avocado Soup - Serves 2

  • 1 medium avocado peeled and deseeded
  • 1/2 a seedless cucumber - chopped
  • 2 tbsp yogurt with any % fat
  • 4 tbsp lemon juice
  • a handful of mint leaves
  • 1/4 tsp ground black pepper
  • 1/4 tsp ground cumin
  • salt to taste
  • water if needed
Simply blend all the ingredients together in an osterizer until smooth, adding a little water if needed. I didn't find it necessary to strain the soup, but I suppose you could if you wanted a truly velvety texture. I garnished with some red chili powder and a sprig of mint. Bon appétit mes amis! 

Friday, 12 July 2013

May I Offer You a Salty Beverage?


I made these yesterday and I'm pleased to report that they turned out so well! These salty drinks are the perfect thirst quenchers for this warm weather, and I hope you give them a try.


Namkeen Lassi - makes 500ml or 2 cups

  • 1 cup of plain yogurt with any % fat
  • 1 cup of cold water
  • 1 tbsp chaat masala
  • 1/2 tsp roasted ground cumin
  • a pinch of black salt
Simply blend all the ingredients in an osterizer (blender) until smooth and adjust the salt if necessary. Serve this chilled, or over crushed ice, with a dash of black pepper and a sprig of mint.

Jaljeera - makes 1L or 4 cups

  • 1/3 cup of fresh mint leaves
  • 1/3 cup of fresh coriander (stems and leaves)
  • 2 tbsp lemon juice
  • 1 tbsp roasted ground cumin
  • 1 tbsp amchur powder (dried mango powder)
  • 1 tbsp black salt
  • 3 cups of ice water
Make a paste of the herbs and spices by combine them in a blender until smooth. Add the lemon juice and spice mixture to the ice water and adjust the salt if necessary. You can strain the jaljeera if you don't like tiny bits of herbs in the juice, but personally I love chewing them between sips. This is best served cold and garnished with boondi. For extra fun, try coating the rim of the glass in sugar, and for the step by step action please check out my video!


Friday, 5 July 2013

To Stuff, or Not to Stuff?

I never grew up eating East Indian paranthas, and I certainly never thought I'd have to make one. Of course, that wasn't gonna fly after I married a Punjabi. My first attempt was a disaster - the stuffing burst out of the dough and the parantha itself resembled a map of Ireland. I may have cried a little. Five years later, I'm relieved to say that I have finally overcome this culinary challenge, and I once overheard my husband telling my mom-in-law about the delicious parantha breakfast I had prepared one day - success! 

There are two methods I use for stuffing my paranthas, but before I get to that, here are the measurements for the stuffings in this week's video:

Aloo Paneer Stuffing - makes approximately 4 paranthas
  • 150 gm of paneer - crumbled
  • 2 small potatoes - boiled and mashed
  • 1 green chili pepper - finely chopped
  • 1/2 an onion - finely chopped
  • 2 tbsp of freshly chopped coriander
  • 1 tbsp of whole cumin seeds
  • 1 tsp of cumin powder
  • 1/4 tsp red chili powder
  • salt to taste
Mix all the ingredients together in a bowl and ensure that they are well incorporated. Small lumps are perfectly acceptable. 

Patta Gobi Mattar - serves 4
  • 2 cups of chopped cabbage
  • 1 medium tomato - chopped
  • 3/4 cup of defrosted green peas
  • 1 medium onion - sliced
  • 2 cloves of garlic - chopped
  • 1 green chili pepper - finely chopped
  • 1 tsp whole cumin
  • 1 tsp coriander powder
  • 1/2 tsp turmeric powder
  • 1/4 tsp red chili powder
  • 2 tsp canola oil or any other vegetable oil of your choice
  • salt to taste
  • fresh coriander for garnish
Please note that Patta Gobi Mattar is a cooked subzi (vegetable dish). I typically use the leftovers to make my paranthas. The subzi should be prepared like this

Working with different stuffings has taught me that not all paranthas are created equally. The most popular way to stuff a parantha is to roll out a thick chapati, spoon some stuffing into the centre, gather the outer edges, and pinch them together in the form a large dumping. This method works well with aloo, paneer, finely chopped onion, or any combination thereof. Rolling out the parantha presents few challenges and a round shape and be easily achieved.

For certain stuffings I have found the sandwich method to be most effective. This involves rolling out two very thin chapatis, spreading the stuffing on top of one, and covering it up with the other. This works best with radish, cauliflower, and any leftover subzis. The only drawback to using this method is that in the rolling phase, the parantha can (and mostly does) become extremely large. This, however, may not be a bad thing.

Finding your stuffing method can take time and practice, but eventually you will find a way that works best for you. Please check out this week's video to see the action! 

Wednesday, 19 June 2013

Urad Dal - It's about time!

As usual, I fell off the Earth sometime back in February. Every time I posted a new video on YouTube and spoke the words "please check out my blog," I felt a twinge of guilt. Of course, I've still been cooking, and still been posting pictures like crazy; I just haven't blogged. So today, I'm re-entering the world of online self-publishing with a simple and delicious recipe for urad dal. 

This recipe uses urad dal without the shell. Urad dal when still in their shell, are most often referred to as black lentils and are commonly used in dal makhani. This version is yellow in colour when cooked, and is much lighter. In addition to being lighter, this dal is extremely simple to prepare. I get the correct texture each time by remembering a simple ratio of 1:3 - that is, 1 part dal to 3 parts water.  Here's a recipe for two, but if you keep the ratio in mind, you'll be able to prepare this dal for any number of people. 

Urad Dal (serves 2)

  • 1/2 cup of shelled urad dal
  • 1 and 1/2 cups of water
  • 1 large tomato*
  • 1/2 an onion*
  • 2 cloves of garlic*
  • 1 inch piece of ginger*
  • 1 green chili pepper*
  • 1 tbsp canola oil or other vegetable oil of your choice
  • 1 tbsp whole cumin seeds (jeera)
  • 1 tbsp garam masala
  • 1 tsp turmeric powder (haldi)
  • 1/4 tsp red chili powder
  • salt to taste
  • freshly chopped coriander for stirring into the dal, and for garnish
  • a pressure cooker
*Cut up these items any way you like, it doesn't need to be attractive

Start out by thoroughly washing the dal. I like to use a kitchen strainer for this because it makes my life easier. Now heat up the oil in the pressure cooker, and add the whole cumin seeds to the hot oil. 

Once the seeds start crackling, add the chopped veggies along with the ginger, garlic, and chili pepper. As these items cook, add the spices and salt to taste. Finally, add the dal and water.

Now close the cooker, and turn up the heat to medium high. Allow the dal to steam for 3 whistles then turn down the heat and let it simmer for another 10 minutes. When the cooker stops hissing you can open it up and stir in some freshly chopped coriander. The dal will be cooked, but you should still see the shape of the individual grains. If it seems too thick for you, add a little water and adjust the salt.  

Now you can transfer it to a serving dish and garnish with some more coriander. This is best enjoyed alongside rice or chapati. That's all there is to it, but if you'd like to see all the cooking action, then check out my channel on Friday, and don't forget to subscribe! 

Thursday, 7 February 2013

New Year's Resolutions SUCK - Have a Smoothie

What is our obsession with this date on the calendar? Just because a new year begins does not mean that I have to make my life all new and sparkly. I'll sparkle when I want to sparkle. Clearly I've broken one of my resolutions - three actually. I haven't started reading anything; I'm not eating as many raw fruits and veggies as I resolved to; if I'm lucky I might drink pure milk 3 times a week. Anyway, I was determined to do better today so I made a smoothie. Here's the recipe for what I have (somewhat stupidly) nicknamed The Banamangberry Smoothie.


The Banamangberry Smoothie (makes approximately 16 oz.)

  • 1 large banana
  • 1 medium sized mango
  • 5-6 strawberries
  • 1/4 cup plain yogurt
  • 2 tbsp wheat bran
  • 2 tsp lemon juice
Peel and cut up the banana. Wash the strawberries and remove the leaves. Cut up the mango by whatever method you would normally use. Then put all the fruits and the other ingredients into an osterizer/blender/magic bullet/vita-mix and blitz them until smooth. Pour into a glass and happily drink your 3 servings of fruit. Just because I can't stick to a goal doesn't mean you shouldn't enjoy a yummy fruity drink. 

Tuesday, 22 January 2013

Brownie in a Mug - Still Undecided


A friend of mine recently posted 50 Life Hacks to Simplify Your World to Facebook. Intrigued by anything claiming to simplify my world, I clicked the link and discovered at #34 the recipe for a brownie in a mug. Ever the fan of chocolate, I couldn't resist trying out the brownie and was pleasantly surprised when it didn't explode in the microwave. I did make some minor adjustments to the recipe, but overall I was satisfied with the result. So here it is: brownie in a mug.


Brownie in a Mug (serves 1 or 2 if you like to sharing)

  • 1/4 cup all purpose flour
  • 1/4 cup sugar
  • 2 tbsp cocoa powder
  • 2 tbsp olive oil (I used light olive oil for less calories)
  • 3 tbsp water (I used closer to 5 to get the right texture)
  • pinch of salt
  • vanilla ice cream for topping (I didn't have any)
  • microwave
Add all the ingredients to a microwaveable mug, saving the oil and water for last. Thoroughly mix the ingredients in the mug until they form a thick yet smooth and gooey consistency. Microwave the brownie in the mug for 1 minute and 40 seconds. I ended up microwaving mine for a little longer because after the suggested time, I didn't quite look ready. And in retrospect, I probably should have taken the above picture BEFORE digging in, but I hadn't thought of it until it was too late. I don't know how often I would make this brownie, though I'm happy to have tried it once. This may or may not end up being both the first, and last time; but in the words of Justin Bieber and many before him: "Never say never."

Thursday, 17 January 2013

Edamame Vegetable Soup

A few months ago I received a complimentary issue of Canadian Living. I couldn't remember the last time I enjoyed reading a magazine that much. Then I immediately wondered when I became someone who enjoyed reading about cooking, home decor, or health and wellness. Wasn't this a "Mom   Magazine?" Well if it be Mom, then Mom be I. The articles were thoughtful, useful, and relevant, and ever since the mailman shoved it into our box back in November, it has moved from bedside to counter to kitchen table. My  own mother recently asked if we should throw it in the recycling and I nearly body-checked her to the ground. I'm considering blogging my way through a few of the recipes in the magazine, so let's see how this goes. 

Moving along, I love soup. I don't know anyone who doesn't love soup. We have it when we aren't feeling well, it comforts us, and we associate it with love. Also, it's winter - the perfect soup weather. For the last 2 months, I've been drooling over a recipe for Edamame Vegetable Soup that I read in Canadian Living. I finally gave it a try and am happy to report that it is scrumptious! I had the trifecta - the listed ingredients, the time, and a kitchen all to myself - so I set about making my soup. Here's the recipe, and I hope you love it too!

Edamame Vegetable Soup - as printed in Canadian Living November 2012 (serves 8)
  • 1 tbsp olive oil
  • 2 carrots thinly sliced
  • 2 ribs of celery thinly sliced
  • 1 onion diced
  • 2 cloves of garlic minced (I grated mine for a finer texture)
  • 1/4 tsp pepper (I assumed ground black pepper, but I think white would work just as well.)
  • 3 cups vegetable broth
  • 1 zucchini thinly sliced
  • half sweet red pepper diced
  • 2 tbsp sodium-reduced soy sauce
  • 1.5 tsp grated fresh ginger
  • 1/2 tsp sesame oil
  • 450 g medium firm tofu
  • 1 cup frozen shelled edamame, thawed
  • I also added 1 tsp of red chili oil (because I couldn't resist.)
The instructions given were fairly simple; I'll paraphrase: 

In a large pot, heat the olive oil on medium heat and cook the carrots, celery, onion, garlic and pepper for 8 minutes while stirring occasionally. At this point the recipe says: "Add broth, 3 cups water, zucchini, red pepper, soy sauce, ginger and sesame oil." Since 3 cups of water were not originally listed in the ingredients I was a little unsure about what exactly this meant, but I think it's safe to say that in order to make a recipe for 8 people, you would in fact need 3 cups of water AS WELL AS 3 cups of vegetable stock. 

Now that you have everything (except the tofu and edamame) in a pot along with 6 cups of fluid, bring everything to a boil, then reduce the heat and simmer for 8 minutes, or until the carrots are tender. Use this time to cut the tofu into 1 cm cubes, then add it along with the edamame to the soup and simmer for an additional 3 minutes. 

If you exactly follow the recipe, then each serving will cost you approximately 105 cal, which is pretty good if you like to count. Adding the chill oil will add an extra 5 cal. If you don't have edamame, you can substitute green peas, lima beans, or french green beans and I'm sure it will be just as yummy. Bon appétit!


Tuesday, 8 January 2013

Intentions for the New Year

I'm not one for New Year's resolutions. When I think of something I want to do, I do it - or if I'm in a procrastinating mood, then I think of doing it later. That being said, I have been trying to live a healthier life by working out regularly and eating a more balanced diet. In addition to these small efforts, I've thought of 5 intentions that I would like to carry out from here onwards. They are:

1. Drink more water
2. Drink at least 1 cup of milk per day
3. Eat more raw fruits and vegetables
4. Walk at least 3.2 km 5 times a week
5. Read more

So far I'm on target, with the exception of the milk. As I type this, I realize that it's 9:15 PM and probably too late to drink anything if I want an uninterrupted sleep (damn it.) Add to the list of intentions my desire to do more blogging. I always desire to do more blogging so maybe this year I actually will. Let's see what happens. For now, here's a recipe for dhania chutney which is made from coriander. 

Dhania Chutney (makes 2 cups)
  • 1 large bunch of coriander (or cilantro)
  • 2 small tomatoes, or 1 large tomato depending on the size
  • 4-5 Spanish thyme leaves, or ajwain ka patta
  • 3-4 cloves of garlic
  • 2-3 green chili peppers
  • salt to taste
Prepare the tomatoes and coriander by thoroughly washing them and coarsely chopping them (to allow for easier blending.) Now, simply blend all the ingredients until smooth and adjust the salt as you go. Enjoy this chutney alongside samosas, chaat, pakore, tikkiyaan, paranthe and more!