Pages

Thursday, 6 August 2009

Eggless Cheesecake - Equally Satisfying!


Hello All! It's been too long since my last post, but I've been rather busy of late. Nevertheless, I take this time and opportunity to share a fun little recipe with you - an eggless cheesecake that I made for Pranav's birthday last weekend. You don't need too much, and it wont take you more than an hour to finish the job. Here we go!


Eggless Cheesecake (serves 6-8)

  • 16 arrowroot buscuits
  • 1/4 cup of milk
  • 1/3 melted butter
  • a dash of cinnamon
  • 8 ounces of softened cream cheese
  • 1/3 cup of sugar
  • 3/4 cup of sour cream 
  • 8 ounces of whipped cream
Start by taking out the day's frustrations and mash the arrowroot biscuits to pieces. Put the crumbs in a bowl and soften them with the milk and butter. Add the cinnamon for an unexpected hint of spice in the crust. The biscuits will take on a doughy texture - they should be soft, but not too mushy. Press the doughy crust into a 9-inch dish and bake it in the oven at 350 degrees for 6 minutes. Next, combine the remaining items in a large bowl, and keep beating, stirring and mixing until the filling is silky smooth. When the crust is cool, pour in the filling and put your cake into the fridge to chill. A no-bake cheesecake requires at least 10 hours to set, so I recommend doing this at night and sleeping through the temptation to stick your pinky in for a sample. Your cake will be ready to enjoy the next day.  If you like toppings on your cheesecake, here's the recipe for a quick glaze.

Strawberry Glaze Topping (to cover the cheesecake)

  • 2 cups of fresh strawberries - chopped
  • 1 tablespoon cornstarch
  • 2 teaspoons lime juice
  • 1/8 cup water
  • 1/4 cup sugar
Keep the strawberries separate while you mix the cornstarch, lime juice and water in a bowl. The cornstarch will completely dissolve, and you should now add this mixture to the strawberries in a saucepan to cook on medium-low heat. When it thickens and becomes translucent, add the sugar. Keep tasting until you're satisfied with the sweetness. For a more tart glaze, don't add all the sugar. Pour this topping over the cheesecake when it cools, or serve it on the side. Bon Apetit!

Sunday, 26 April 2009

Dahi Wali Bhindi


Ok folks! It's been a really long time since I updated this blog. I've been rather busy of late with my parents in town, and when there's a mother why would I be cooking that often right? Right. Anyway, this weekend Pranav mentioned to me that it had been a while since I made my famous Dahi Wali Bhindi or Okra in Yogurt Sauce. I don't even know how famous it is, but it was one of the first dishes I cooked for my in-laws, and apparently it was a hit. So today, I endeavour to make this dish, and here's how it goes. Enjoy!

Dahi Wali Bhindi (Serves 3-4)

  • 1/2 kg of okra, washed, and cut into 1 inch pieces
  • 2 tbsp of ghee/clarified butter
  • 1 tsp jeera seeds/whole cumin
  • 1 large onion finely chopped
  • 1 fresh red or green chili
  • 2 large tomatoes chopped
  • 1 tsp dhania powder/coriander powder
  • t tsp haldi/turmeric
  • 1 tsp red chili power
  • 4 tbsp dahi/yogurt
  • salt to taste 
  • fresh dhani/coriander for garnishing
Heat the ghee in a kadai or wok on medium. When the oil is hot enough add the jeera seeds. You can test this by dropping in one jeera seed and if it starts to crackle then it's just right. Then add the chopped onion and fry this until the pieces become translucent.

Now add the chopped tomato along with the fresh chili. When the tomatoes melt down a little, add the okra and cook these for at least 4 to 5 minutes. While the okra is cooking, mix the spices in with the yogurt. I've known some people to add the spices at the same time as the tomato and not mix it in with the dahi. I'm not sure that it makes a difference. 

Now add the spicy yogurt to the kadai and allow this to cook until the bhindi is soft. This is also the time to add the salt, but definitely check to see that you add the amount you like because yogurt can get salty very quickly. Garnish with the fresh dhania and serve with rice or roti!

Thursday, 12 February 2009

The Quickest Fix for Upma


Since our first trip to Pondicherry, I've been getting these insatiable cravings for idli-sambar and upma. These, along with the occasional dosa and rasam-chawal, are the only South Indian food obsession to which I can lay claim. Corner House next door takes well enough care of me when I want dosa, and rasam is simple to make at home, but ever since that trip, and our breakfast at Anand Bhavan on New Years day, I've been unable to get their upma out of my head. 

My mother makes excellent upma. I can't say that I always liked it when I was growing up, but now having acquired a taste for it, and having eating enough upma from a variety of places, I can safely say that hers is one of the most delicious I've tasted. My mother-in-law makes it too, but often adds cashews and raisins, giving it a very Mughalai quality - if it's possible to describe upma as Mughalai.  For me, the best will always be my mom's, and the ghee-laden version I had in Pondi. I've since managed to make a highly convincing knock-off at home using very few ingredients. Here is is:

Upma (serves 3-4)

  • 2 tbsp ghee/clarified butter
  • curry leaves - 5 or 6 should do, or more if you like the flavour
  • 1 tsp mustard seeds
  • 2 green chilies finely chopped
  • 1 medium sized tomato chopped
  • 1 medium sized onion finely chopped
  • 1 cup of roasted sooji/rava/cream of wheat/semolina
  • 2 cups of water
  • salt to taste
Start of by heating the ghee on medium low in a kadai or wok. Add the mustard seeds, and then the curry leaves. The leaves should crackle on contact with the ghee. When they look crispy, add the chopped chilies and chopped onion. Stir the onions so they are evenly coated in ghee. After that, you can leave them alone until they become translucent.  Now add the chopped tomato. Cook until the tomato pieces become soft, but not drippy or squishy. 

Add the roasted sooji, and take care to mix it in properly with the ingredients cooking in the kadai. When everything is combined, start slowly adding the water; half-a-cup at a time should do the trick. The sooji will start to absorb the water, and swell. It usually takes twice its weight in water, and will double in quantity. This is also a good time to add the salt. The water will help it to evenly flavour the upma. The upma is done when all the water is absorb, and when the sooji has attained a mildly sticky and gooey consistency. The more it cools, the more congealed it will become, so be sure to eat it at the consistency you like best. 

Some Variations

The above is my own very simple version of upma. A more authentic version will include 1 tsp each of urad dal and chana dal. These should be soaked overnight for easy cooking and should be added at the same stage as the onions. They will remain whole when the upma is done, but will be soft and easy to chew. Some variations also require finely chopped ginger to be added with the onion, and others still recommend a pinch of hing/asafetida when the mustard seeds are added, and you can even add a pinch of turmeric for colour. 

Here's another quick hint: if you don't get ready roasted sooji, you can do it yourself. Add the sooji to the kadai without any oil or ghee. Keep stirring it on medium high until the grains darken a little in colour. They will also emit a slightly nutty full-bodied aroma. Keep the now roasted sooji aside, and go ahead with the upma. If you feel like it, you can always garnish with a little chopped coriander. Or, if you're feeling super creative, stuff the upma inside a roasted capsicum. It does wonders for the presentation. Bon appetit!

Sunday, 1 February 2009

Yes, palak paneer is easier than I thought.


Palak paneer has quickly become one of my favourite dishes. I've been eating it for years at restaurants, and weddings but as far as I can remember, my mother and I have only made it at home on one occasion (and that was actually aloo palak - palak paneer's cousin.) Over the last few months, I must have made this creamy dish at least 5 times and each time it has been a winner. I think what turned me off making it before was the amount of preparation I thought would have to do. Since then, I've gotten it down to a science, and I can manage a very tasty palak paneer in under 25 minutes. 


Palak Paneer (serves 2-3)

  • 2 packed cups of fresh palak or spinach
  • 2 small tomatoes, or 1 large tomato
  • 1 medium sized onion
  • 1 tsp ginger garlic paste
  • 1 tbsp ghee
  • 1/2 tsp  haldi or turmeric
  • 1/2 tsp lal mirch or red chili powder
  • 1 tsp dhania or coriander powder
  • 3 tbps fresh cream 
  • 1/2 cup of paneer cut into small cubes
  • salt to taste
Wash the spinach leaves very carefully; they're delicate, and can sometimes harbour a bit of dirt. Steam the leaves until they wilt. If you're using a pressure cooker, then one whistle should do the trick; if not, then just about a minute or two in a normal pot. Add a little water before steaming, but not too much because the palak will leave some water of its own. When the leaves are wilted, they will be darker in colour and much softer, but they shouldn't disintegrate. 


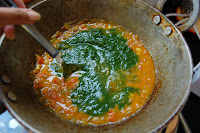
Puree the palak in a mixie and keep it aside. Heat the ghee in a kadai, and add the onion, ginger garlic paste, and jeera. When the onion becomes clear, add the tomato, haldi, lal mirch, and dhania powder. Cook, and cover until the tomato and onion dissolve into a paste (it will leave some ghee on the sides.) Add the palak to the paste and cook it until it darkens in colour. This should take about 2 or 3 minutes. Now add the paneer, and add salt to taste. Keep the kadai covered and cook for another 2 or 3 minutes. Garnish with thinly sliced tomatoes or ginger, and serve with naan, or chapati. 

A quick note: To make aloo palak, substitute the paneer for aloo or potato. Boil the aloo until it is soft, then cut it into small cubes. Fry the cubes until they are golden brown on all sides and add these to the cooking palak.